iOS Analytics SDK
Overview
The Liftoff SDK is a thin and light attribution SDK which will take about 15 minutes to integrate.
- Add the Liftoff SDK to your Xcode project. It works with iOS versions 10+.
- Record installs.
- Record other in-app engagement events.
- Verify that it's working by visiting our testing harness dashboard (link available in the developer page within the customer dashboard).
- Check a few boxes during Apple's app store submission process.
Add the Analytics SDK to your Xcode project
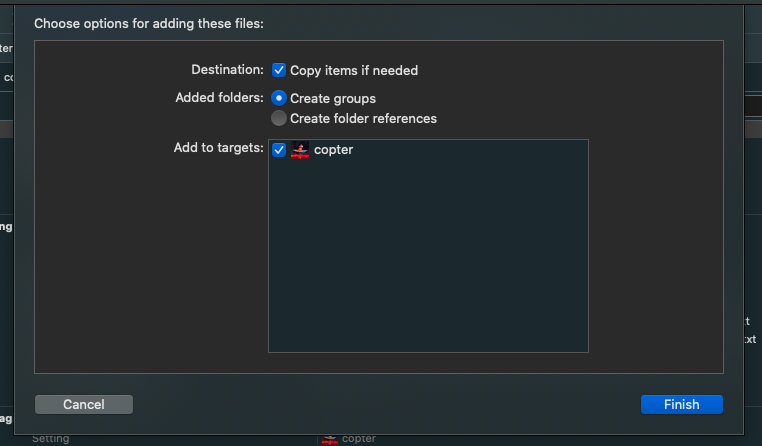
Download and unzip the latest version of the Liftoff SDK (3.0.2).
In the SDK, there's a folder called
Liftoff.xcframework. Drag theLiftoff.xcframeworkfolder into your project.- Check "Copy items if needed".
- Select "Create groups".
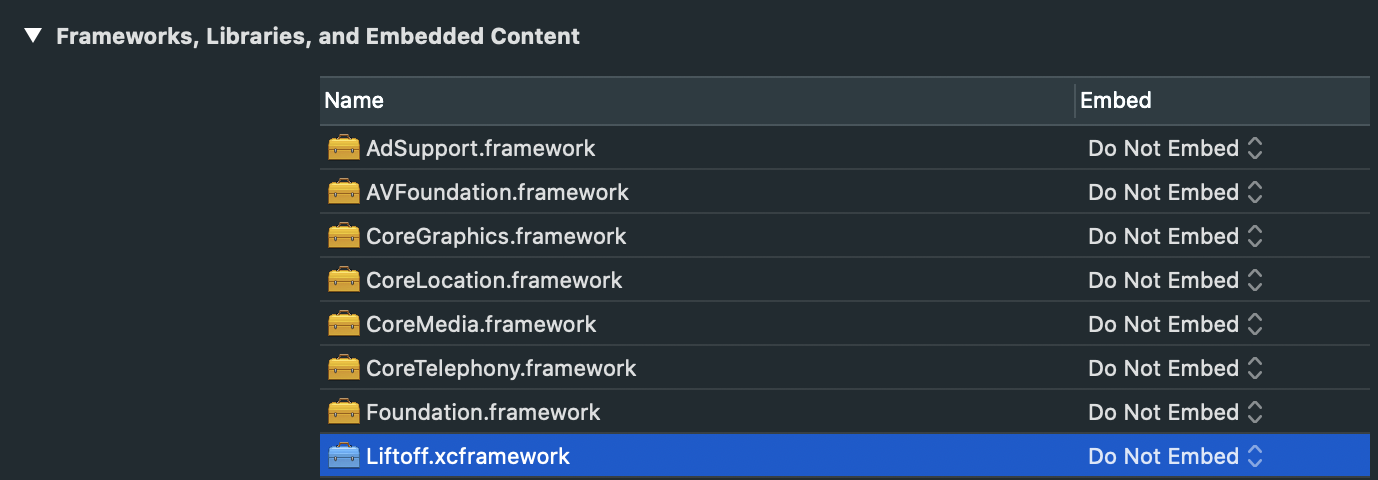
Confirm that the Liftoff XCFramework has been properly added by navigating to the project settings.

Swift projects only: If your project doesn't yet have a bridging header file, XCode will prompt you to create one. Click Create Bridging Header.
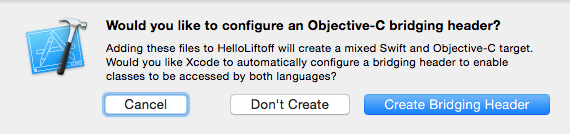
If you were not prompted to create a bridging header, it may be because you dragged the top-level Liftoff folder into your project (rather than its contents). You can create your own bridging header file manually by creating a new
.hfile, then setting the value for the "Objective-C Bridging Header" key in your project build settings.Link against Apple's
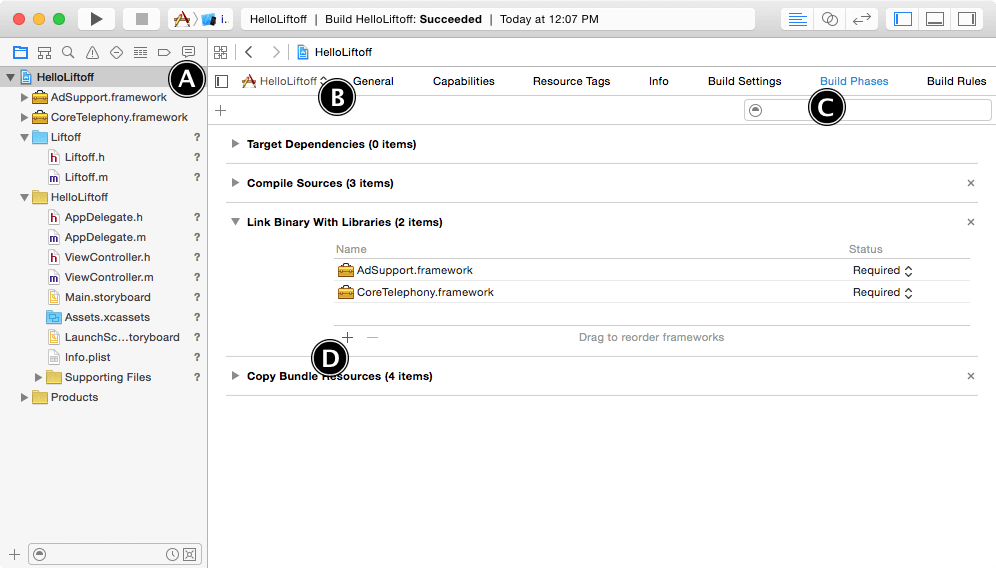
CoreTelephony.frameworkandAdSupport.framework:- Click on your project in the Project Navigator.
- Under TARGETS, select your target.
- Click on the Build Phases tab.
- Click on the + button under "Link Binary with Libraries" and choose
ColeTelephony.frameworkandAdSupport.framework.
Swift projects only: Add
#import "Liftoff.h"to the bridging header file created in step #3. This will give your Swift code access to theLiftoffclass.Set
testModetotrueduring local development. These events will be visible testing harness dashboard (link available in the developer page within the customer dashboard). SettestModetofalsein production (events will not be visible on testing dashboard).The SDK will send a payload matching the Macros table.
Record installs
Call Liftoff's startSession method when your app is opened; this will record
an install if this is the first time your app has been opened, as well as a
new_session event. We recommend adding it to applicationDidFinishLaunching:
or application:didFinishLaunchingWithOptions in your Application delegate.
- Swift
- Objective-C
func application(application: UIApplication,
  didFinishLaunchingWithOptions launchOptions: [NSObject: AnyObject]?) -> Bool {
  // Initialize SDK
  Liftoff.shared(apiKey: API_KEY, appId: APP_ID, testMode: true)
  // Start session
  Liftoff.shared()?.startSession()
  return true
}
#import "Liftoff.h"

- (BOOL)application:(UIApplication *)application
    didFinishLaunchingWithOptions:(NSDictionary *)launchOptions {
  [[Liftoff sharedInstanceWithApiKey:API_KEY appId:APP_ID testMode:YES] startSession];
}
Your API Key and App ID can be found in the developer page within the customer dashboard.
Record other in-app engagement events
Recording engagement events like "signup", "purchase" or "tutorial_complete" is important because we can then buy ads which optimize for post-install behavior like purchasing rather than just installs.
Use the code snippet below to record events:
- Swift
- Objective-C
Liftoff.shared()?.recordEvent("signup")
[[Liftoff sharedInstance] recordEvent:@"signup"];
Events will be displayed in the Liftoff analytics dashboard and can also be used to optimize Liftoff's ad buying. We recommend lowercase event names with underscores instead of spaces.
You should not use programmatically generated strings (e.g. that are user-specific) as event names; instead use hard-coded strings such as "signup" that describe a general point in your application's user flow.
Note that our analytics system also takes care of counting the number of users for whom a given event has occurred. So if you already have a "purchase" event for example, you do not need to also log a "first_purchase" event.
Tracking revenue (transaction amounts) on your events
If your app has purchase events, you can optionally record a revenue amount for those events. This makes it easier to see how much revenue is resulting from your marketing spend in the Liftoff UI.
- Swift
- Objective-C
Liftoff.shared()?.recordEvent("purchase", revenue: 15.0, currencyCode: "USD")
[[Liftoff sharedInstance] recordEvent:@"purchase" revenue:@15.0 curencyCode:@"USD"];
The currencyCode parameter is a 3-letter ISO 4217 currency code. Common ones are: USD, GBR, EUR, AUD, CAD, JPY, CNX, MXN. A full list can be found here.
Verify that it's working
Once you've integrated the SDK, launch your app on a phone. You should see the last few events that we've seen from your app in the testing dashboard (link is displayed in the developer page within the customer dashboard) grouped by app version.
If you don't see your events, feel free to contact your CSM.
Apple's App Store Submission
When you're ready to submit your app to the app store, Apple will ask whether your app uses the Advertising Identifier (IDFA). Answering no would mean that Liftoff will not be able to leverage the IDFAs for users that would've potentially opted in for higher quality advertising. If you would like to display the consent dialog, answer yes and proceed to the next steps.
On the "Prepare for Upload" step, choose Yes for the following option:
Does this app use the Advertising Identifier (IDFA)?
Selecting Yes will reveal a few more options. Ensure both of these are checked:
[x] Attribute this app installation to a previously served advertisement
[x] Attribute an action taken within this app to a previously served advertisement
Finally, check the agreement box under the Limit Ad Tracking Setting in iOS section.
NOTE: Liftoff SDK uses HTTPS encryption to send event details.
That's it!